
Making edible cake decorations or delicious toppers for cupcakes is easy when you know how to use candy molds to create delicious homemade candies. They’re an excellent way for beginner bakers to add personality and flavor to their baked treats with minimum effort. With hundreds of designs to choose from, you know there’s one to match your mood. Read on for our candy mold FAQ.
What’s the Difference Between Plastic and Silicone Candy Molds?
Our clear plastic molds are reusable, easy to clean (simply flex to release remaining candy), and come in several varieties suitable for lollipops, candy cups and pretzels, among other things.
Silicone molds are a bit more of an investment but, unlike the plastic molds, they are dishwasher safe. Our instructions below can be used with both kinds of molds, but are primarily meant for use with plastic molds.
How Do I Use a Candy Mold?
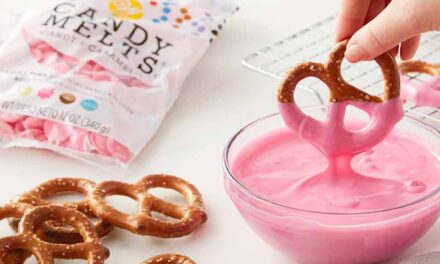
For basic, solid candies, use Candy Melts® candy or melting chocolate and follow the instructions on the package. Once melted, use a spoon, melting bottle or disposable decorating bag to fill the mold and gently tap it lightly to remove air bubbles will float to the surface.
Place the filled mold in the fridge or freezer until the entire bottom of the mold looks frosted over and the candy is set. Watch out for dark-looking areas, as these indicate candy is still soft. Unmold candy by turning the mold over about an inch from a flat surface or by gently flexing or tapping the top of the mold to loosen them.
What if I Want to Add a Color to My Candy?
If using a plain design with little to no detail, the melted candy can be poured directly into the mold. If using a more detailed design, or if you want to add different colors, fill a piping bag with melted candy or any excess chocolate you might have on hand and snip a small hole off the tip. Piping the details will allow you to control where you place the candy—just remember to let each color dry before placing another on top.
How Do I Add a Nut Center to My Candy?
To get the classic salty-sweet combo of nuts in candy or chocolate, melt your candy as directed, place it in a disposable decorating bag and then fill each cavity half full. Tap to let the bubbles escape, and then place one nut per each cavity in the mold. Fill the rest of the cavity with more candy, tap again to release bubbles and place in your refrigerator or freezer until set.
How Do I Make Layered Candy?
For layered candy that looks like it’s got striped sides, melt two or more colors of candy or chocolate and place in disposable decorating bags, then pipe in the desired number of layers. Tap the mold after each layer to make sure you release any air bubbles, then chill to set. For a different look, you can experiment with propping the mold at an angle while it chills.
How Do I Add a Filling to My Candy?
To make candy with a delicious creamy or caramel center, fill each cavity of your mold less than half full and use a decorator brush to paint the sides all the way to the top edge of the cavity until no light can be seen through it. Chill for a few minutes to allow candy to set. Fill each cavity with your filling of choice, but make sure it’s room-temperature or cold—a hot filling could melt all your hard work. Leave about 1/8 inch below the edge, and then top if off with the rest of the melted chocolate or candy. Tap the mold to release any air bubbles, and chill to set. If candy doesn’t easily release, chill for a few extra minutes until the bottom of the mold looks completely frosted over.
How Do I Make Candy Lollipops?
Our candy lollipop molds come with a convenient notch to hold your treat or lollipop sticks. Pipe melted candy or chocolate about halfway into each cavity and tap it to release air bubbles. Insert a lollipop stick in the notch, twirling it around until it’s completely covered. This ensures the stick gets a firm grip on the candy. Fill each cavity to the top with more melted candy, tap and chill until set. Check the underside to see if it’s frosted over. Once done, tap the mold on your counter and lift it by using the stick.
Now don’t be afraid to switch things up and swap out any of the milk chocolate people usually use for some decadent dark chocolate or some white chocolate. Hopefully, we’ve answered your most important candy-making questions, but if there’s something we haven’t covered (or if you make some beautiful candies you’d like to show off), let us know in the comments below or on Instagram by tagging @Wiltoncakes. Happy candy making!


How long will the candy/chocolates keep? What containers or wrapping do you suggest?
Why don’t you have the candy molds? Is there someplace else I can order them?
Hi Peggy, I recommend shopping at your local Walmart or Joann’s for Wilton candy molds.