

When it comes to covering your cake pop, Candy Melts candy makes it easy and fun! Learn how to melt and thin Candy Melts and get some helpful tips on how to decorate cake pops with Candy Melts candy.

Candy Melts candy can be used for dipping, drizzling, dunking and decorating – but it’s perhaps best known for coating cake pops.
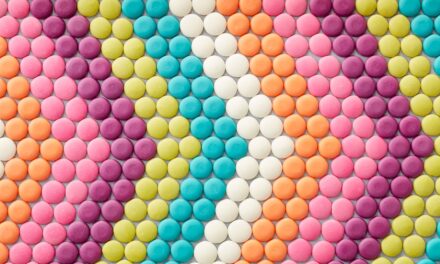
Available in a variety of colors and flavors, Candy Melts candy helps seal in the flavor and moisture of a cake pop. It also acts as a blank canvas for decorating!
Whether you melt it using a melting pot or a double boiler, Candy Melts is a great way to personalize your cake pop creations. Use this helpful guide to ensure you get smooth and shiny cake pops every time.

What is Candy Melts Candy?
Candy Melts candy is a sweet confectionery coating that can be used to dip treats, mold candy, pipe and drizzle decorations and even make ganache. It’s available in a variety of colors and flavors, can be melted to a semi-liquid state and sets hard with a smooth, shiny finish.
Colors can also be mixed to form new shades and leftover candy can be re-melted and used again.

How to Melt Candy Melts Candy
Candy Melts candy can be melted in one of three ways: in the microwave, using a double boiler or in the Candy Melts Melting Pot. For cake pops, the best methods are the melting pot or double boiler.
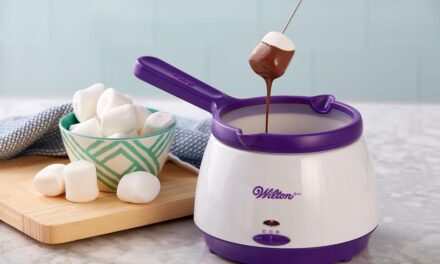
Candy Melts Melting Pot
The Candy Melts Melting Pot is the safest way to melt candy for cake pops. This pot can melt up to 2 1/2 cups of Candy Melts candy in less than 10 minutes and will keep your candy warm until your project is completed.
Begin by placing the silicone base in the pot and preheating for about 5 minutes.
Once preheated, add your candy to the pot, stirring occasionally until completely melted. For faster melting, try cutting your candy up in smaller pieces.
When your candy is completely melted, move the switch on the pot to the warm setting to keep candy fluid as you dip your cake pops. If the candy begins to thicken or cool, you can rewarm it by switching it back to the melting setting.
When you’re finished dipping your treats, turn the pot off and let it cool completely before cleaning.
Double Boiler
The double boiler method uses steam to melt your candy and is great for melting large amounts.
To melt your candy using a double boiler, fill a small pot with about 1 in. of water. Place a large heat-safe bowl on the pot and place the pot on low heat. Add your candy to the bowl, stirring constantly to help distribute heat. The steam rising from the boiling water will melt your candy.
If too much steam is releasing from the pot, turn down your heat. Water and steam can cause your Candy Melts to seize, rendering them unusable.
Once your candy is almost completely melted, quickly remove the bowl from the heat and continue stirring until smooth and glossy.
If your candy starts to thicken or harden, you can remelt it by placing it back on the pot and stirring over low heat.
Microwave
The microwave is the quickest way to melt your Candy Melts, though it’s best reserved for melting smaller amounts of candy.
There’s a higher risk of burning your candy if you use the microwave, especially when you’re melting more than 12 oz. at a time. Save this method for making your candy cake pop decorations!

How to Make Candy Melts Thinner
If your melted candy appears too thick or is not smoothly covering your treat, you can thin it out using EZ Thin Dipping Aid. These crystals dissolve into your melted candy, making it the perfect consistency for dipping and drizzling.
To use EZ Thin, simply add 2 tablespoons of crystals to 12 oz. melted candy. Stir until completely incorporated. If you’re using less than 12 oz. of melted candy, start with a small amount of EZ Thin, then continue adding until you achieve the correct consistency.
You can also thin out your melted candy with solid vegetable shortening (2 teaspoons per 12 oz. bag). Do not use liquid vegetable oil, butter, milk, water or any other liquid to thin your candy. These will all cause your candy to break or seize, rendering it unusable. This can also happen if your candy is burned or overheated.
Whether it’s thinned with EZ Thin or vegetable shortening, Candy Melts will still harden and retain its sheen.

How to Prevent Candy from Cracking
Sometimes if you place a freezing or cold cake pop in warm candy, it can cause the candy to crack as it hardens. To prevent this, let your cake pops come to room temperature before dipping them in the warm candy.
Once all your cake pops have been coated, you can let them sit for a few minutes at room temperature to harden slightly before placing them in the refrigerator to finish setting. This will give the warm candy a chance to cool down gradually and the cold blast from the fridge won’t crack your smooth candy coating.

How to Make Cake Pops
Easy to make and fun to decorate, cake pops make great edible gifts or party favors. They’re a cinch to customize with your favorite flavors and colors and are perfect for those moments when you just need a little taste of something sweet!
You can make cake pops with your favorite homemade cake recipe from scratch; however, there’s no shame in using a boxed cake mix here. Boxed cake mix produces a moist cake crumb, perfect for cake pops. You can also add in your favorite mix-ins to make it feel a little more “homemade” (we suggest mini chocolate chips or sprinkles for a confetti look).
Learn all about how to make cake pops, including how to size and roll them, here: Easy, Perfect Cake Pops Recipe.

How to Store Candy Melts Candy
The great thing about Candy Melts is that leftover melted candy, or candy that has dripped off your treat and is crumb-free, can be re-melted and re-used. To keep your candy as fresh as possible, follow these simple storage instructions.
- Allow pre-melted candy to cool completely.
- Place candy (or leftover candy wafers) in an airtight plastic bag or container.
- Store your candy in a cool, dry place. Do not freeze or refrigerate your candy, as the moisture from these cold environments can be absorbed into your candy, causing uneven melting.

Candy Melts Tips and Tricks
- Whatever method you use, make sure that your bowl, pot and utensils are completely dry, as any water could cause your candy to harden and seize
- Make sure not to overheat your candy by melting on too high of a setting or for too long; it will lose its consistency if it is overheated or if liquids are added
- Candy Melts candy is ready for molding, dipping or drizzling when the texture is smooth and shiny
- If candy becomes too thick, add a small amount of EZ Thin until it reaches the desired consistency
- If you don’t have EZ Thin, you can also add 1½ teaspoons of vegetable shortening per 10 oz. of candy, or 2 teaspoons shortening per 12 oz. of candy
How to Decorate Cake Pops with Candy Melts

Create a cute edible garden with these Sprinkled Succulent Cake Pops. Formed to look like cacti then covered with Green Candy Melts and sprinkles, these cute treats are perfect for birthdays, Mother’s Day or garden parties.
Show off your team spirit with these School Spirit Cake Pops. Made using two different colors of cake mixture, these cake pops are easy to customize and fun to make for any sporting or school event.


These Over the Moon Cake Pops are out of this world! A fun addition to any galaxy or space-themed party, these cake pops are decorated using Pearl Dust edible decorating powder, so they sparkle and shine!
Take a bite out of summer any time of year with these cute Fruit-Shaped Cake Pops. Decorated to look like lemons, limes, grapefruits, dragon fruits, kiwis, watermelons and papayas, these bright and colorful pops use Candy Melts candy to add fun and decorative elements.


Marbling is a fun candy technique that looks great on a cake pop. Swirls of white and blue candy make these Blue Marbled Cake Pops perfect for baby or wedding showers. Customize your marble swirl using any color you’d like!
Have you decorated cake pops using Candy Melts candy? Share a picture of your treats on social media and tag us @wiltoncakes.


Is it 2 tbsp of EZ Thin or 2 tsps? Different amounts in directions and notes section
Thanks for catching our mistake, Ana! I’ve confirmed with the test kitchen and you need 2 tablespoons per 12 oz. bag of Candy Melts.
If you use solid vegetable shortening then it is 2 teaspoons per 12 oz. bag.
I’ve also updated corrected the post for future reference. Happy baking!