

Eid al Adha, the festival of the sacrifice, is one of the holiest days in the Islamic calendar. It commemorates the prophet Ibrahim’s willingness to sacrifice his son when God commanded it. It also celebrates the journey Muslims make to Mecca, Saudi Arabia to complete Hajj, a sacred right in the faith that is incumbent upon every Muslim who is able. Traditionally a lamb is sacrificed for the occasion and the meat distributed to family, the community and to the poor. It is a deeply spiritual time as well as one to spend time with loved ones.

There are as many Eid traditions as there are Muslim cultures and communities around the world and every family has their own special ways that they celebrate. Our family goes to the mosque for prayers on Eid morning and out for a special breakfast or lunch at a restaurant. We also take the little ones to a toy store and let them pick a present. Later we visit with friends and family and enjoy our favorite foods.
For this Eid al Adha cake I wanted to create something special for my daughter. She is three years old and in that stage of loving all things princess. Since Eid doesn’t receive the same level of fanfare here in the US as Christmas, I wanted the cake to be whimsical and fun for her and for other Muslim children to light up their eyes and spirits. I drew inspiration from traditional Islamic architecture, with its beautiful domes and arches, as well as the gingerbread cakes you see often at Christmas time.

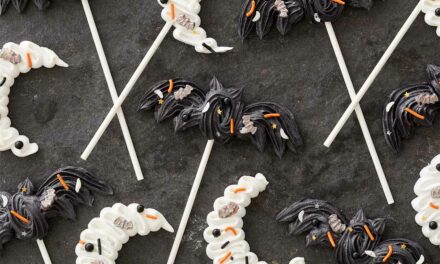
This Eid Village cake is constructed using sugar cookies and is decorated with a pretty, pink color scheme and dozens of sugar pearls and meringue kisses. The beauty of this cake is that it gives the illusion of being two tiers by having a top tier of cookie buildings. In addition, the recipe for the cookies will provide enough dough for the houses, plus extra for little cookie Hajjis (people who have completed Hajj) and lambs, thus completing the theme of an Eid village.
Of course Eid would not be Eid if there weren’t coffee and tea flowing. Did you know that the popular “mocha” coffee drink is derived from Al Moka, a Yemeni port city that was one of the earliest centers of coffee cultivation and trade? It seems only fitting that an Eid celebration cake incorporate a beverage steeped in history and tradition for the Muslim community.
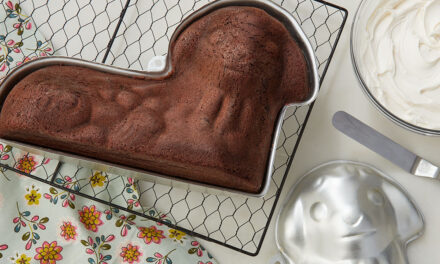
The cake itself consists of three layers of delicious white chocolate mocha cake filled with espresso buttercream and enrobed in white chocolate buttercream. The buttercream itself is a foolproof mock Swiss meringue buttercream, making it lightly sweet and silky smooth. The recipe uses powdered sugar, butter and pasteurized egg whites, which eliminates the need to heat the eggs and sugar as in traditional Swiss meringue.

Feel free to decorate your cake with whatever candies, colors and designs inspire you. This little Eid village should feel like your very own fantastical, whimsical take on a special time of year. Let it be an excuse to gather family together to create something wonderful together and to fill your home with love and laughter.
Helpful Tools and Products
- Meringue Powder
- Ready to Use Royal Icing
- Piping Tips (including 21 for the lamb’s wool)
- Gingerbread cookie cutters
- Sugar Pearls
Recipes
For the Sugar Cookies
- 1 1/2 cups cold unsalted butter in chunks
- 2 cups granulated sugar
- 4 eggs
- 2 teaspoons vanilla extract
- 5 cups all-purpose flour, spooned and leveled
- 1/2 cup corn starch
- 1 teaspoons salt
- 1 teaspoon baking powder
For the Royal Icing
- Use either Wilton Ready to Use Royal Icing and adjust the consistency accordingly or follow the recipe here. To flavor the icing, replace some of the water with vanilla extract.
- Gel food coloring in your colors of choice.
For the Cake
- 1/2 cup white chocolate, chopped
- 2 1/2 cups all-purpose flour, spooned and leveled
- 2 1/2 teaspoons baking powder
- 1/2 teaspoon salt
- 1 tablespoon espresso powder
- 1/2 teaspoon cinnamon
- 1 1/2 cups granulated sugar
- 3 large eggs, room temperature
- 2 teaspoons vanilla extract
- 1 1/2 cups whole milk
- 3/4 cup unsalted butter, room temperature
For the Buttercream Frosting
- 6 ounces pasteurized egg whites (*see notes)
- 24 ounces powdered sugar
- 22 ounces unsalted butter, room temperature
- 6 ounces white chocolate
- Dash of lemon juice
- 2 tablespoons vanilla extract
- 2 teaspoons espresso powder
For the Cookies
- Print the cookie building templates and trace onto parchment paper or card stock.
- Place a sheet of parchment paper on your baking sheets.
- Sift the flour, corn starch, salt, and baking powder in a large bowl.
- Add the flour mixture and sugar to the bowl of a food processor and pulse just to combine.
- Add the butter chunks and pulse until all of the butter is incorporated into the flour. The texture should resemble sand.
- Add the egg and vanilla and pulse until the mixture combines into clumps.
- Tip the dough onto a clean work surface and knead to incorporate any remaining mixture or clumps and form into two discs. Wrap the discs in plastic wrap and refrigerate until firm, about 30 minutes.
- In between two sheets of parchment paper to prevent sticking, roll out the cold dough in batches to approximately 1/4 inch thick.
- Set your templates onto the dough and use a kitchen knife, bench scraper or paring knife to cut out the panels. You will need at least 12 building panels. Use a bench scraper to gently lift each panel and set them at least one inch apart on the baking sheets.
- Gather up the scraps, roll again, and cut any remaining panels or cookies.
- Preheat the oven to 350 F. Set cookies to chill in the fridge while the oven preheats.
- Bake the chilled cookies for 10-12 minutes, just until the bottoms start to turn golden brown. The cook time will vary slightly depending on how thick you roll out the cookies. The buildings will take longer than people or lamb cutouts.
- Remove from the oven, allow to cool for 5 minutes and transfer to a cooling rack to cool completely.
To Decorate the Cookies
Let your creativity loose and decorate the cookie buildings however you like with candies, sugar pearls, etc. If you wish to decorate the cookies as I have, you will need three consistencies of royal icing: stiff for piping 3D decorations like the lambs wool (I used tip 21 for the wool), medium for outlining and borders, and thin for flooding blocks of color.
Use either Wilton Ready to Use Royal Icing and adjust the consistency accordingly or follow the recipe here. To flavor the icing, replace some of the water with vanilla extract. Use gel food color to color the icing the colors you like. I recommend decorating the cookies prior to decorating the cake as it is easier to do so while the panels can lay flat on the table.
I also created some meringue kisses to complete the look of the cake. If you would also like to use meringues, you can follow the Wilton recipe here, however I lower the oven temp to 225 and bake for an hour.
For the Cake
- Combine the white chocolate and milk in a microwave safe bowl and heat for 1 minute. Whisk to combine. Repeat every 30 seconds until the white chocolate is completely melted. Add the espresso powder and cinnamon and whisk to combine. Allow to cool completely to room temperature.
- Preheat oven to 350 degrees. Grease three 6- inch cake pans and line with parchment paper.
- In a medium bowl, whisk flour, baking powder, and salt until well combined and set aside.
- In the bowl of a stand mixer fitted with the paddle attachment, cream the butter and sugar until light and fluffy, about 3- 4 minutes.
- Reduce speed to lowest setting and add eggs one at a time, allowing to fully incorporate after each addition. Add the vanilla extract.
- Beginning with the flour mixture, alternate adding the flour and milk mixture, allowing to incorporate after each addition (this will mean 3 additions of flour and 2 additions of milk). Scrape down the sides of the bowl and mix to ensure the batter is fully combined. Be careful not to over mix.
- Divide the batter evenly between the three pans. You may wish to use a kitchen scale to ensure accuracy.
- Bake for 35- 40 mins. The cakes will be finished when the tops of the cakes spring back lightly when touched or a toothpick inserted into the center comes out mostly clean.
- Allow cakes to cool in the pan for no more than 10 minutes, then turn out onto a wire rack to cool completely.
For the Buttercream
- Melt the white chocolate over a double boiler, whisking constantly until completely smooth. Remove from heat and set aside to cool completely to room temperature.
- In the bowl of a stand mixer fitted with the paddle attachment, add the sugar and pasteurized egg whites. Mix on low until thoroughly combined. Scrape down the sides of the bowl. Whip on medium high for 5 minutes.
- Set the mixer to low and slowly add in cubes of room temperature butter, vanilla and salt and mix until combined. Scrape down the sides of the bowl.
- Set mixer to high and beat for 10 minutes until the mixture is light, fluffy and creamy. Your frosting will look curdled at some point. This is normal! Continue to beat and it will eventually come together!
- Remove 1 1/2 cups of frosting to a smaller bowl and set aside. You will use this to make the espresso buttercream.
- Make a well in the center of the buttercream in the stand mixer and add the cooled white chocolate.
- Set mixer to “stir” or the lowest possible setting and stir for 5 minutes. This will remove any air bubbles and ensure a silky, creamy consistency.
- Now make the espresso buttercream. Dissolve the espresso powder in two teaspoons vanilla extract. Stir the mixture into the reserved buttercream until thoroughly combined.
Assembly
- Decorate the cookie buildings however you like with sugar pearls, candies, etc. You can also decorate the little Hajjis and lambs to complete the look of your Eid village theme.
- Create the top cookie tier by “gluing” four building panels together with medium consistency royal icing. Place a panel face down on your prepared work area. Pipe a line of icing along one length of a side panel and gently place it at a 90-degree angle so that the bottoms and sides of the panels are evenly connected. Use a large object, such as a water jug, to prop the side up while it dries, ensuring that the side remains at a 90-degree angle to the base. Repeat on the opposite side with another panel. Allow the icing to completely dry before setting on top of the cake.
- Stack and fill the cake layers with the espresso buttercream. Apply a thin crumb coat of white chocolate buttercream to the cake and place in the fridge to set for 30 minutes.
- Frost the cake by applying frosting and smoothing over the top and sides. Use a bench scraper or cake comb to create smooth sides. Since the cake will be hidden by the cookie buildings you don’t have to make the sides completely smooth; simply frost the cake with an offset spatula.
- Place two quarter sized dollops of frosting onto the back of the cookies and gently press them into the cake, repeating all around the sides of the cake.
- Place the cookie tier on top and very gently press it into the icing enough to stabilize it but not so much that you begin squishing the cake.
- Put the finishing touches with any meringue cookies or candies that you like.
- Enjoy!
Recipe Notes
- Cake recipe adapted from Liv for Cake.
- Faux SMBC recipe adapted from Sugar Hero.
- According to the USDA it is completely safe to consume raw pasteurized egg whites. The egg whites are heat treated to kill off harmful bacteria and it is required by the USDA of all egg products. Be sure to use 100% pasteurized egg whites without any additives or preservatives or the egg whites will not whip. If you still find it a little strange to consume raw egg whites you can use Wilton’s American Buttercream recipe following the same instructions as above for flavoring with espresso and white chocolate. Be aware however that the frosting will be quite a bit sweeter than the SMBC. You may find extra lemon juice will cut the sweetness but don’t go overboard.
- If making this cake for kids and you are concerned about the caffeine in the espresso, rest assured the quantity is minimal. You can use decaf espresso powder if you like and it will not affect the taste or consistency. I tested these recipes with instant coffee and I do not recommend substituting coffee in either recipe. The flavor will be too weak.
- I suggest baking the cookies and cake and decorating the cookies on one day and then assembling and decorating the cake the following day. Remember to allow the cookies to cool completely before decorating.

