

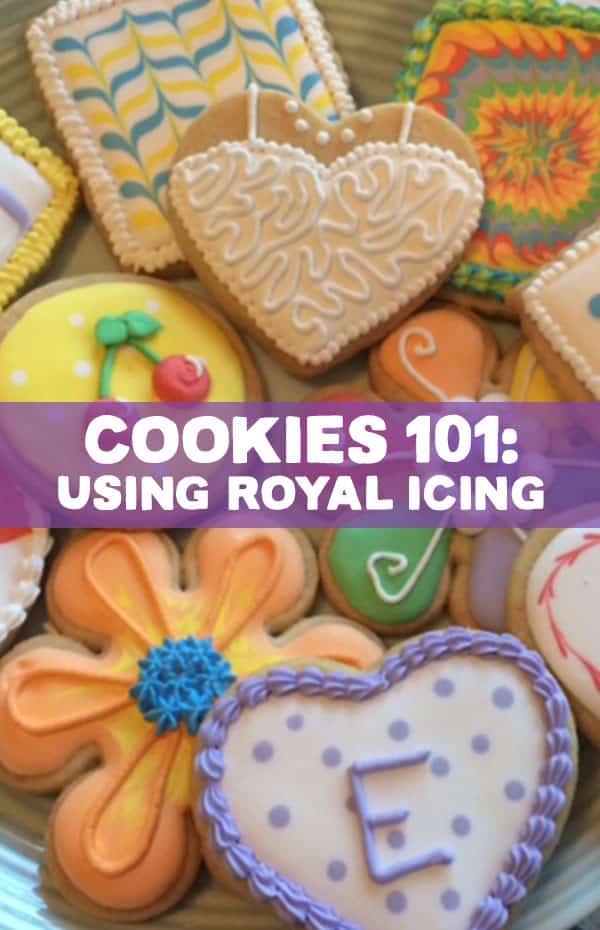
Have you ever seen those beautifully decorated royal icing cookies and thought to yourself “how do they do that?!” Royal icing cookies can be intricate and detailed, which can make them intimidating. However, with just a few techniques anyone can make gorgeous cookies! The Wilton School offers a Cookies 101 class that will teach anyone – beginners or advanced decorators – how to use these techniques. I recently took this class and would love to share with you what I learned.
Cookie decorating starts with baking. You want to use a recipe developed specifically for roll-out cookies. This is so that when you cut out your shapes, they don’t spread or distort in the oven.
I suggest using Wilton’s Roll-Out Cookie recipe. Once your cookies are baked and ready to go, make the royal icing.
If you’ve never made it before, don’t be scared. It only takes 3 ingredients! You can get the royal icing recipe here. The important thing to remember with this easy royal icing recipe is to let the icing mix for the full 7 to 10 minutes.
It’s crucial to incorporate all that air so the icing doesn’t fall flat on your cookies. To color your royal icing, use Wilton’s gel icing color or Color Right.
When the icing is made, it will be light and fluffy; very comparable to a buttercream-look. This is the best consistency for piping borders such as shells, beads or zig-zags.
If you plan on doing a border, set some of your royal icing at this consistency aside and pipe the borders last. When not using your piping bags and tips, cover them with a warm, damp towel. Doing this will help to prevent the royal icing from drying out.
To achieve other techniques, such as flooding, thin down the icing with warm water. In Cookies 101, we learned the 15 second rule. Thin down your icing until you can lift your spatula and drizzle icing back into the bowl.
The icing should settle in with the rest of the icing in about 15 seconds. This is when you are ready to flood your cookies! When flooding your cookies use a smaller decorating tip, like tip 2, or no tip at all.
Start by outlining your cookie. Keep the icing about 1/8 –to– 1/4 of an inch away from the edge, slightly more if you plan to do a border. Once the cookie is outlined, fill it in with royal icing. If there are any small spots left open use a toothpick to spread the icing and fill them in. You can let the icing set (takes a few hours) and pipe decorations on top.

However, when the icing is still wet you can do another technique called marbling. Marbling is possibly one of my favorite decorating techniques, like, ever. After flooding your cookie, take another color of royal icing at the same flooding consistency and pipe dots or lines on your cookie.
Then take a toothpick and simply drag it through the icing. You can drag it in one direction for a more uniform look or drag it in all different directions for a true marbled look.
In just one class, I learned how to make all the cookies you see below! To learn more about Cookies 101 and so much more, check out Wilton’s other other great instructional classes.
We’d love to see how your royal icing topped cookies turned out. Let us know in the comments below or share your experience on Instagram by tagging @Wiltoncakes.


