
This decadent chocolate layer cake is a chocolate lover’s dream, especially when paired with homemade chocolate buttercream frosting to double down on the chocolate flavor.

With just a few simple ingredients and these helpful tips, you’ll be able to make a delicious chocolate cake with chocolate frosting in no time!
How to Bake a Chocolate Cake
Setting Your Oven Temperature
Make sure your oven is fully preheated to 350℉ before you place your cakes in the oven. If your oven is too hot, your cake may burn or become dry. If it’s not hot enough, you could have a gooey center with overdone edges. If you’re unsure of your oven temperature, you can test it with an oven thermometer, just to be sure.
It’s also important to avoid putting your cakes in the oven as it’s preheating. The oven heats up very quickly when preheating, so this rapid rise in temperature may cause your cake to burn. Just remember that, when it comes to baking, patience is a virtue.
Make Sure Your Pans are the Right Size
This chocolate cake recipe is specifically designed for a 9 x 2 inch round cake pan. Using a smaller pan can result in a cracked dome or under-baking from too much batter in the pan. Using a larger baking pan will result in a thinner, flatter cake layer since the batter will be more spread out.
As a general rule of thumb, cake pans should be filled 2/3 full to prevent spilling. If you’re baking a smaller cake smaller than 9 inches and have leftover batter, you can always make cupcakes!
Prepare Your Cake Pans
Spray your pan with baking spray or non stick vegetable spray before filling with the cake batter to prevent your cake from sticking. You can also use a parchment paper circle in the bottom of the pan for easier removal. Simply lay the parchment paper circle on top of the sprayed pan and fill with batter. The parchment paper does not need to be sprayed again.
Using a parchment paper circle is a great way to get a nice, smooth finish on your top cake layer. Simply peel the parchment from your cooled cake and you’re ready to go.
Chocolate Cake Ingredients
Using Room Temperature Ingredients
Before you get started mixing the batter, make sure all your ingredients are at room temperature. This will help prevent overmixing and will give you a lighter, more tender cake.
Take Care when Measuring Ingredients
For best results, use a liquid measuring cup to measure liquid ingredients and measuring cups and spoons to measure dry ingredients. Baking is a bit of a science, so any alteration of ingredients may affect the outcome of your cake. To learn more about how to properly measure your ingredients, check out our video on How to Measure Ingredients Correctly.
Don’t Over or Under-Mix Your Batter
When you’re incorporating your dry and wet ingredients, you just need to mix until the ingredients are incorporated. You shouldn’t see any flour in the batter and it should be nice and smooth. Once everything is incorporated, stop mixing. If you overbeat your batter, or cause gluten to develop, the cake may come out dense and flat.
How to Melt Chocolate
This chocolate cake recipe calls for 6 oz. of semi-sweet chocolate, which gives this cake that rich, chocolatey flavor! Melting the chocolate can be done in the microwave but you can also use a double boiler for better control.
If you decide to use a double boiler, take extra care that no moisture from the steam gets into your chocolate. This may cause seizing and you’ll have to start over.
Chocolate Cake Ingredients FAQs
Can I use cocoa powder instead of semi-sweet chocolate?
The short answer here is no. Because cocoa powder is dry and melted semi-sweet chocolate is liquid, swapping them will affect the cake’s outcome. Melted chocolate is also higher in fat than cocoa powder, which adds to that fluffy moist texture of this cake.
Can I use semi-sweet morsels instead of baking squares?
While morsels are often less expensive and easier to find, we wouldn’t recommend using morsels for this recipe. Since the semi-sweet chocolate in this recipe needs to be melted, you want to use a chocolate that melts easily. Morsels have less cocoa butter than baking squares, so there’s a higher chance of your chocolate clumping or burning.
Morsels are also designed to melt slightly while retaining their shape so they’re often used for chocolate chip cookie recipes. Melting them down can be difficult because they may contain stabilizers or even wax to prevent them from losing their shape.
Baking squares, on the other hand, are meant to be melted. They have a high cocoa butter content, which helps them melt evenly and easily. So stick with baking squares for this chocolate cake recipe.
Baking Your Chocolate Cake
How to Divide Your Batter
The best way to get nice, even cake layers is to measure how much batter you put in each pan. Check our Cake Baking and Serving Guide to help you determine how much batter is needed for your pan size.
Baking Your Cake
Make sure your oven rack is in the center position and the oven is fully preheated to 350℉. Place both pans in the oven, leaving at least 1 inch between pans to allow for air flow and even baking.
Resist the urge to open the oven door until the last 10 minutes of bake time. The rush of cold air from opening the oven too soon can cause your cake to collapse. Use the oven light to check your cake, if necessary.
How to Tell if a Cake is Done
There are a couple ways to check if your cake is done baking. The easiest test is to insert a toothpick into the center of your cake. If it comes out clean (no wet batter on the toothpick), your cakes are done.
You can also lightly press down on the cake with your finger. If the cake springs back, it’s done. If your finger indents the cake, it needs more time.
Give Your Cake Time to Cool
When your cake layers are done, remove them from the oven and place each pan on a cooling grid to cool for 15 minutes. Removing the cake from the pan when it’s still hot can cause your cake to stick or break.
Once your cake layers have cooled for 15 minutes, you can remove them from the pans. Let them cool completely on the cooling grid before decorating. It should take anywhere from 30 to 60 minutes for your cakes to completely cool to room temperature.
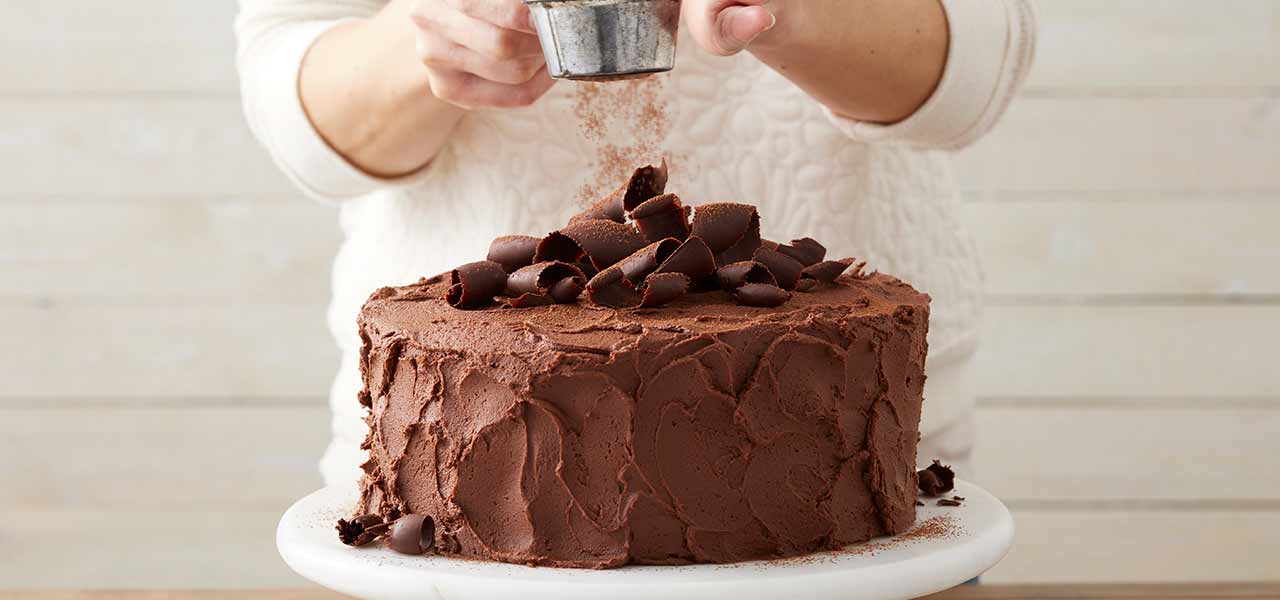
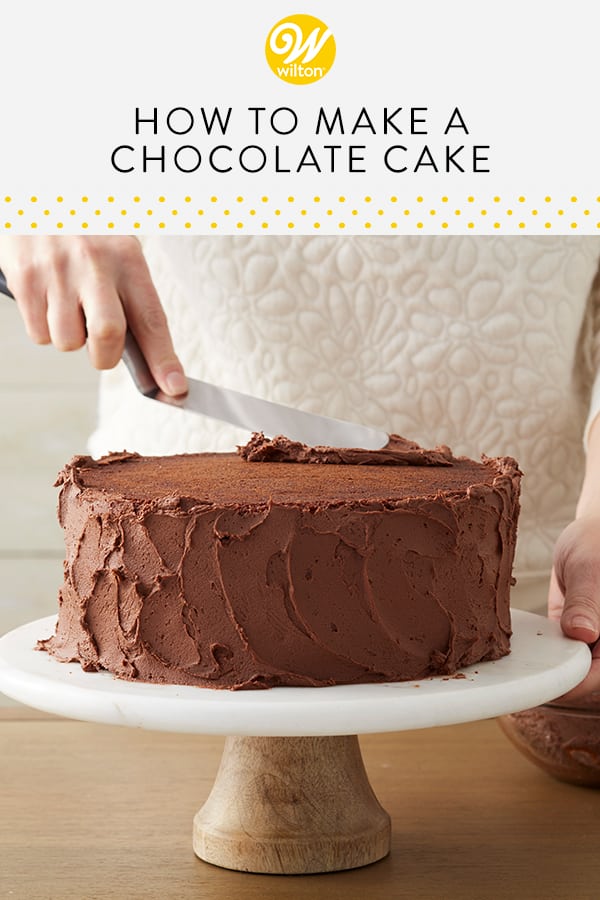
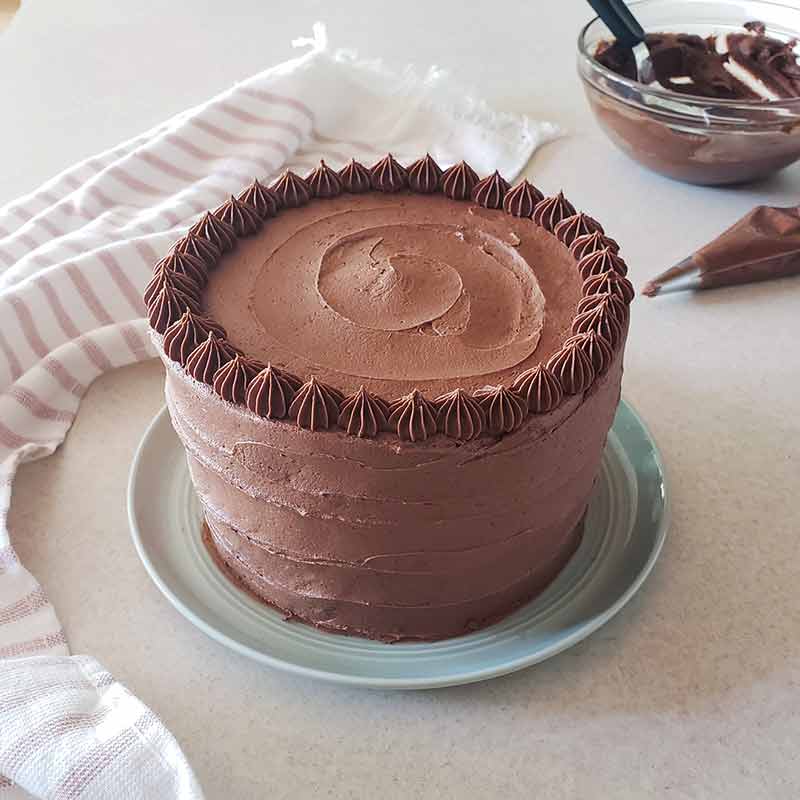
Decorating Your Cake
Now comes the fun part, decorating! This recipe makes two 9 inch cake layers, so you can make two single-layer cakes or one two-layer cake. Use our delicious Chocolate Buttercream Frosting for a double chocolate treat or try one of our other tasty frosting recipes:
Decadent Chocolate Layer Cake
Equipment
- Medium Bowl
- Large Microwavable Bowl
- Electric Hand Mixer or Stand Mixer
Ingredients
- 2 ½ cups All-Purpose Flour
- 1 teaspoon Baking Soda
- ½ teaspoon Salt
- 6 squares Semi Sweet Chocolate (6 oz.)
- ¾ cup Butter 1 1/2 Sticks, Softened
- 1 ½ cups Milk
- 1 ½ cups Granulated (Not Powdered) Sugar
- 3 Eggs
- 2 teaspoons Vanilla Extract
Instructions
- Preheat oven to 350℉. Spray cake pans with nonstick vegetable spray. Set it aside.
- In a medium bowl, combine flour, baking soda and salt. Set it aside.
- In a large microwavable bowl, melt chocolate and butter for 2 minutes, or until butter is melted. The mixture can also be melted in a saucepan over low heat. Stir until smooth. Transfer to a large bowl; add sugar and beat with an electric mixer until combined.
- Add eggs to chocolate mixture, one at a time, mixing well after each addition. Add vanilla; mix well.
- Alternate adding flour mixture and milk to chocolate mixture, beating well until everything is incorporated. Pour into prepared pans.
- Bake 32 to 36 minutes at 350℉, or until toothpick inserted in center comes out clean.
- Cool cakes in pans on a cooling grid for 15 minutes. Remove from pans. Transfer to a cooling grid to cool completely before decorating.
Video
Looking for more chocolatey recipes? Check these out below:
What’s your favorite reason to make chocolate cake? Any other tips and tricks to share when it comes to making chocolate cakes or cupcakes? Let us know in the comments below, or post a picture of your cake on Instagram and tag us @wiltoncakes.


Very informative
Thank you for sharing this article
Can I use cake flour instead of all purpose?
Yes you can!
this is really nice to read..informative post is very good to read..thanks a lot!
Looks great, I’ve subscribed to your youtube channel 🙂
Thank you for sharing chocolate cake in a blog and very helpful chocolate cake recipe blogging.
What are you using for chocolate swirls a top the cake
We used shaved chocolate for the top decoration.
Hi Janquel, is it one and a half cup of milk or one to a half cup of milk?
Hello! It’s one and a half cups of milk 🙂
How come you never have the alterations for high altitude?
Hi Billie, what is your elevation level/general location?
How much milk is required? I don’t see it on the list of ingredients!
Hi Shoshana, 1-1/2 cups of milk is needed for this recipe.
What kind and how much milk is needed for cake recipe?
Hi Noreen, 1-1/2 cups of milk is needed.
Thank you!
You’re welcome! 🙂