


Make a dessert that’s simply spooktacular with these cute Halloween sugar cookies. Made using our tasty roll-out sugar cookie recipe and decorated with cookie icing, these easy Halloween cookies are just as fun to make as they are to eat!

Looking for a Halloween dessert that’s no trick, all treat? These easy Halloween cookies are for you! Learn how to make Halloween cookies using our tasty roll-out sugar cookie recipe, then decorate your cookies with black and orange cookie icing for a dessert that’s great for beginners of all ages.
What makes these cookies so fun and easy is that they are decorated with Wilton Cookie Icing, which you can get in a variety of colors. This icing comes in a bottle, so there’s no need for a piping tip and bag. It can also be warmed up in the microwave, which makes it much easier to use.
While it doesn’t dry hard like royal icing, it will set smooth for a nice finish. Plus, it doesn’t need a full 24 hours to dry! This icing should be set and ready to go in just about 1 hour.

How to use Cookie Icing
Wilton cookie icing is quick-setting and microwavable for easy decorating. Simply heat the bottle and squeeze! The cap is designed to act like a tip, so it’s easy to outline and flood your cookies.
Unlike royal icing, which could take up to a day to dry fully, cookie icing sets smooth in about 1 hour. While it won’t dry completely hard like royal icing, it will set smooth for a clean finish.
How do you decorate Halloween cookies
Follow the microwave instructions on the cookie icing bottle to warm up your icing. This will make it much easier to pipe on your cookies.
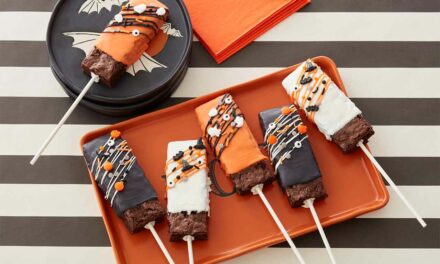
I’m going to walk you through how to decorate the cookies shown here, but feel free to add your own fun decorations, too! Try all our fun cookie icing colors, or let the kids experiment with different Halloween sprinkles. There’s no wrong way to decorate these Halloween treats!
If you have the Cookie Decorating Tool Set, you can use the scribe tool to help coax the icing towards the edge of the cookies, as well as create fun web designs. However, a toothpick will work just as well!

Black Pumpkin Cookies:
- Using the warm black cookie icing, fill in the pumpkin-shaped cookie. Immediately top with desired sprinkles.
Orange Pumpkin Cookies:
- Using the warm orange cookie icing, fill in the pumpkin-shaped cookie. Let it set slightly, about 15 minutes. Using the warm black cookie icing, pipe the eyes, nose and mouth.
Orange Web Cookies:
- Using the warm orange cookie icing, fill in the web-shaped cookie. Using the warm black cookie icing, immediately pipe 4 circles, starting at outer edge and working towards the center.
- Using the scribe tool or a toothpick, drag the wet icing from the center of the cookie to the pointed edge of the web.
- Continue the line on the opposite side, starting in the center and dragging icing to pointed edge. Be sure to wipe off the icing after each drag!
- Repeat around the entire cookie for a total of 8 lines.
Black Web Cookies:
- Using the warm black cookie icing, fill in the web-shaped cookie. Immediately top icing with black sanding sugar. Let the icing set slightly, about 15 minutes.
- Using the warm orange cookie icing, pipe lines, starting with straight horizontal and vertical lines (you’ll pipe a + shape), then piping diagonal lines (the x shape).
- Connect the straight lines with small curved lines, forming a web shape.
Orange Spider Cookies:
- Using the warm orange cookie icing, pipe the center of the spider cookie. Immediately top with candy eyeballs and nonpareils.
- Using the warm black cookie icing, pipe lines on the legs.
Black Spider Cookies:
- These cookies can get a little messy, so we suggest placing your cookies on a cooling grid over a sheet of parchment paper.
- Using the warm black cookie icing, pipe the center of the spider cookie, allowing the icing to drip down the sides. Immediately top with candy eyeballs.
- Using the warm black and orange cookie icings, pipe lines on the legs of the spider, alternating colors. You can gently shake the cookie to help the icing slide off the sides.
- Once you’re done decorating, let all your cookies set for about 1 hour at room temperature.
How to store your Halloween cookies
These cookies can be kept at room temperature for about a week. Since the cookie icing doesn’t dry hard, we don’t recommend stacking these, but you can arrange them in a single layer on a plate or in an air-tight container.
You can also use this same 7-piece Halloween cookie cutter set to make these Pastel Halloween Cookies, great for a spooky soiree or bewitching baby shower.
Decorated with our Ready-to-Use Royal Icing, these treats dry hard and are perfect for gifting as party favors or handing out to neighbors and friends.

Halloween Sugar Cookies Recipe
Equipment
- Ruler
- 7-Piece Halloween Cookie Cutter Set
Ingredients
Roll-Out Cookie Dough Recipe
- 1 cup Granulated Sugar
- 1 cup Butter 2 Sticks, Softened
- 1 Egg
- 2 teaspoon Vanilla Extract
- ½ teaspoon Almond Extract
- 3 ¼ cups All-Purpose Flour
- 1 teaspoon Baking Powder
- ½ teaspoon Salt
For Decorating:
- Orange Cookie Icing
- Black Cookie Icing
- Assorted Candy Eyeballs
- Halloween Sprinkles
Instructions
How to Make Halloween Cookies
- Begin by preheating your oven to 350 degrees F. In a large bowl, cream the butter and sugar with a stand mixer or hand mixer until it’s light and fluffy, then beat in the egg and extracts.
- In a separate bowl, combine the flour, baking powder and salt. Add the dry ingredients to the butter mixture, 1 cup at at ime. This will prevent flour from poofing up all over your kitchen!
- Once everything has come together, divide the dough into 2 balls and set one aside (no need to refrigerate it, we’ll use both portions for this recipe).
- On a floured surface, use a rolling pin to rollout one portion of the dough to 1/8 in. thickness.
- Using the 7-Piece Halloween Cookie Cutter Set, cut out your cookies. We used the spider, spider web and pumpkin shapes, but feel free to use whatever shapes you’d like!To prevent your dough from sticking to your cookie cutters, dip them in flour first. This will also help the cookies keep their shape in the oven.
- Next, repeat step 4 and 5 with the portion of dough that you set aside.
- Bake your cookies on an ungreased baking sheet for 8 to 11 minutes, or until the cookies are lightly browned.Make sure they’re completely cool before decorating.
Video
Notes
Are you making cookies for Halloween? Share a picture of your boo-tiful bakes on Instagram and tag us @wiltoncakes so we can check them out!
If you enjoyed this Spooktacular post check these out!
10 Easy and Delicious Apple Desserts for Fall


what kind of frosting do you recommend for cookies that I plan to mail out at Thanksgiving and Christmas?
Hi Rosada, We recommend royal icing. The great thing about using royal icing for sugar cookies is that it dries hard, so you can package and gift your treats without worrying about the icing getting damaged or smudged. Make sure you allow your cookies a full 24 hours to dry at room temperature before packaging.