
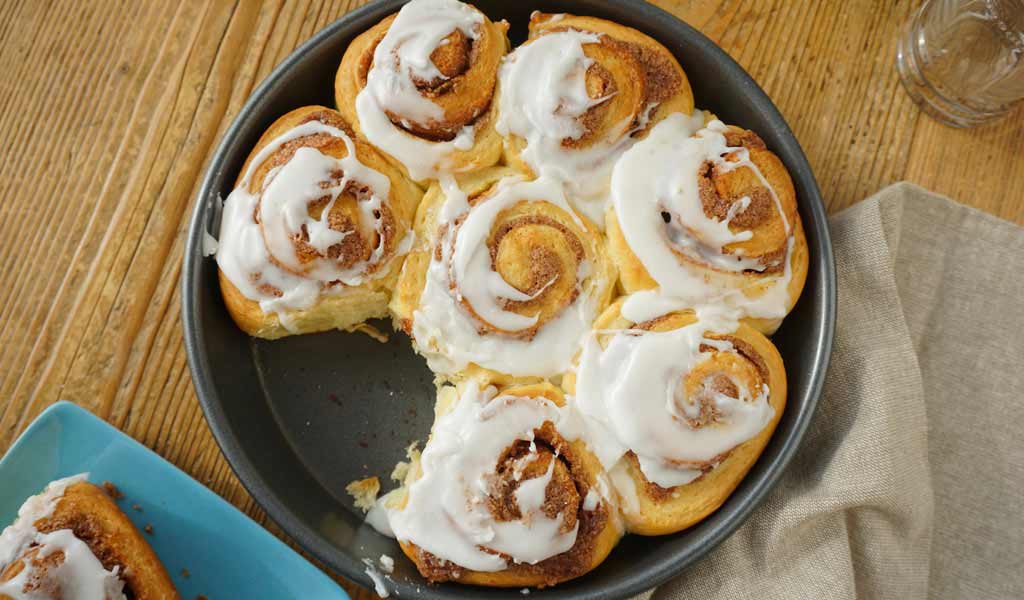
Treat yourself to a delicious breakfast with these easy homemade cinnamon rolls. This recipe uses yeasted dough and makes 8 amazing cinnamon rolls, so it’s perfect for sharing with the whole family. This recipe also includes a simple glaze made with milk and confectioners’ (powdered) sugar.
Few things in life are more perfect than a warm, homemade cinnamon roll on a lazy weekend morning. The warm cinnamon flavor, the sweet sugary glaze…not to mention your kitchen smells amazing!
However, working with a yeast dough can be intimidating, especially if you’re new to baking. But not to worry! I’m going to roll our recipe down into some chewable bites that may even inspire you to try other yeast recipes.
Ready to roll? Me, too!
First, let’s gather our ingredients. Here’s what you’ll need:
Rolls:
- 2/3 cup warm milk (105 degrees F)
- 1 package (0.25 oz.) active dry yeast
- 2 tablespoons granulated sugar, divided
- ¼ cup (1/2 stick) butter, softened
- 1 egg yolk
- ½ teaspoon pure Wilton Imitation Clear Vanilla Extract
- ½ teaspoon salt
- 2 cups bread flour, plus more for dusting
Filling:
- ¼ cup (1/2 stick) butter, softened
- ¼ cup granulated sugar
- 1 tablespoon bread flour
- 1 tablespoon ground cinnamon
Glaze:
- ¾ cup confectioners’ (powdered) sugar
- 1 tablespoon milk

If you’re having trouble finding some of these ingredients, here are some easy swaps. If you’re out of eggs and can’t make a trip to the store, just add an extra tablespoon of milk in place of the egg yolk. The milk will help make up for the lost moisture and fat from the egg. No bread flour? No problem. You can use all-purpose flour instead. Just keep in mind that the dough might be a little sticky, since all-purpose has less protein in it than bread flour. If that happens, just add a tablespoon or so more all-purpose until the dough is easy to handle.
How to Use Active Dry Yeast
The pros will tell you that baking is a science, especially when it comes to working with yeast. The first step is to proof it, aka rehydrate it. A fun fact I learned in culinary school – they call it ‘proofing’ because you want to prove that the yeast is still alive and working as it should.
And the best way to make sure your yeast is alive is to feed it. Warm milk is used to awaken the yeast and then sugar is added to feed it. The yeast will prove itself to us when it gets nice and foamy after letting it sit for a bit.
The finicky thing about yeast is that it’s a bit of a Goldilocks. If our milk is too hot, the yeast will die. If the milk is too cold, the yeast will die. Therefore, we want milk that’s just right.
To make warm milk, gently and slowly heat it to about 105 degrees F. You can do this in the microwave or in a small saucepan on the stove. Be very careful not to overheat the milk or it can scorch. Slow and steady wins the race.
The best way to check and see if your milk is warm enough is to use a thermometer. However, you can also use your skin to test the temperature. The milk should feel like nice, warm bath water, slightly warmer than your body temperature.
Once it’s warm, put it in a large bowl, add the yeast and top it off with 1 tablespoon of granulated sugar. Stir it gently and then let it sit for about 5 to 10 minutes, or until it’s nice and foamy. That’s your proof the yeast is working! Isn’t science fun?!

Making the Cinnamon Roll Dough
Before adding the butter, we want to make sure it’s nice and soft. You can soften your butter by bringing it out of the fridge an hour or so before you start making your cinnamon rolls. You can also cut it into small cubes and leave it out a room temperature, which will help it warm up quickly. The butter can be softened in the microwave at half power for a few seconds at a time. Be super careful you don’t melt the butter – we just want it softened, not melted.
Once your butter is soft, add it – along with the other tablespoon of sugar, the egg yolk, vanilla extract and salt – to the yeast mixture. Mix with an electric mixer (prepped with a dough hook) on medium speed until combined. If you don’t have a dough hook, you can also mix it by hand

Once everything is combined, gradually add the flour and continue mixing until a smooth, elastic dough forms, which should take about 2 to 4 minutes. If you’re mixing by hand, mix until the dough becomes “shaggy”, then knead it on a lightly floured surface until it becomes smooth and elastic.

Spray a large bowl with vegetable spray (or a light coating of oil) and form your dough into a ball. Place it in the bowl, cover with plastic wrap so it’s nice and cozy and place the dough somewhere warm to rise. The top of a warm oven works well, or you can put it in a cool oven with the light on. The top of a high shelf or on top of the fridge are also good spots. Allow the dough to rise for about 45 minutes, or until it has doubled in size.


Making the Cinnamon Roll Filling
While the dough rises, we can get started on the filling. Simply stir together the softened butter, sugar, flour and cinnamon. While you’re at it, you can also spray your 9 in. pan with vegetable pan spray and set it aside for later.
How to Make the Cinnamon Rolls
Now comes the fun part – assembling!
First, punch the dough down. No need to attack the dough with an actual full-force punch. Simply form your hand into a fist and gently push it into the center of the dough. The purpose of punching down the dough is to help remove air pockets that formed while the dough was rising. This will help give your bread a nice fine grain.

Now it’s time to roll! Turn the dough out onto a lightly floured surface. Use your fingers to shape the dough into a rectangle, then use a rolling pin to enlarge the shape.
As you roll the dough, just roll in one direction at a time. Don’t go back and forth with the rolling pin. Roll from front to back of the rectangle and then from left to right. There’s no need to apply too much pressure here since this is a soft dough.
As your rectangle begins to form, start in the middle of the dough and roll out towards each corner, gently forming a more defined shape. If it starts to lose its rectangle shape, pat it back into position with your hands. Even it out again by going front to back and left to right until you have a 12 in. x10 in. rectangle. Don’t beat yourself up over getting a perfect shape. Cinnamon roll dough is very forgiving!

Now you’re ready to spread the cinnamon filling mixture evenly over the dough. This is where you could get a little creative and put some fun additions in your cinnamon rolls.
You could add some nuts, replace the cinnamon with pumpkin pie spice, add raisins, diced apple, etc. I’m more of a cinnamon roll purist and tend to stick with just a cinnamon filling, but the possibilities are endless!

Rolling and Baking Your Cinnamon Rolls
Starting from the long end of the rectangle, begin rolling up your dough, like you would a jelly roll. Make sure the cylinder is tight so the rolls hold their shape.

Once you’re done rolling, pinch the seam to seal all the good stuff inside and place it seam side down on a cutting board.

Using a sharp knife, trim off the ends and cut into 8 equally sized pieces.

Place the rolls into the prepared baking pan, spacing them evenly apart (if there’s space for those trimmed ends, throw those in, too! You can snack on those yourself!). They’ll look like they don’t fill the pan well enough, but don’t worry, they’re going to grow into beautiful cinnamon rolls. Cover the rolls again with plastic wrap and let them rise in a warm spot for 25 to 30 minutes, or until they double in size.

Now it’s time to bake! Preheat the oven to 350° F. Remove the plastic wrap and bake in preheated oven for 25 to 29 minutes, or until golden brown. Soon your home will be full of the comforting smell of homemade cinnamon rolls!

Making the Cinnamon Roll Glaze
No cinnamon roll is complete without glaze! For this easy glaze recipe, simply stir together 3/4 cup confectioners’ sugar and 1 tablespoon milk in a small bowl. You can add more sugar or more milk if the glaze is too thin or too thick.
Carefully drizzle the cinnamon roll icing glaze over the rolls.

These are best served when they’re still warm- with a hot cup of coffee. And remember what Lemony Snicket said, “Anyone who gives you a cinnamon roll fresh out of the oven is a friend for life.” Enjoy!

Was this cinnamon roll recipe easy to follow? Did you think it was a great recipe? Did your family love it?
Share your thoughts and a pic on Instagram, Twitter or Facebook and be sure to tag us @wiltoncakes.
Looking for more delicious recipes that are packed with cinnamon flavor? Check these out:


Delicious Homemade Cinnamon Rolls
These delicious cinnamon rolls are easier to make than you might think! Learn everything you need to know to make them from scratch, including the dough, the filling and the glaze.
Ingredients
For Rolls
- ⅔ cup Milk Warmed (Heated to 105°F)
- 1 package Active Dry Yeast About 0.25 oz
- 2 tablespoons Granulated Sugar Divided
- ¼ cup Butter 1/2 Stick, Softened
- ½ teaspoon Vanilla Extract
- ½ teaspoon Salt
- 2 cups Bread Flour Plus More for Dusting
For Filling
- ¼ cup Butter 1/2 Stick, Softened
- ¼ cup Granulated Sugar
- 1 tablespoon Bread Flour
- 1 tablespoon Ground Cinnamon
For Glaze
- ¾ cup Powdered Sugar (Confectioners' Sugar)
- 1 tablespoon Milk
Instructions
- Heat milk slowly to about 105℉ in a small saucepan or in the microwave.
- Once warm, put it in a large bowl, add the yeast and top it off with 1 tablespoon of granulated sugar. Stir it gently then let it sit for 5-10 minutes, or until it’s foamy.
- Add softened butter, 1 tablespoon of sugar, the egg yolk, vanilla extract, and salt to the yeast mixture. Mix until well combined.
- Gradually add the flour and continue mixing until a smooth, elastic dough forms, which should take about 2 to 4 minutes.
- Spray a large bowl with vegetable spray (or a light coating of oil) and form your dough into a ball. Place it in the bowl, cover with plastic wrap, and place the dough somewhere warm to rise. Allow the dough to rise for about 45 minutes, or until it has doubled in size.
- Make filling by mixing together the softened butter, sugar, flour and cinnamon in a seperate bowl. Set aside for later.
- Once the dough has risen, form your hand into a fist and gently push it into the center of the dough to remove air pockets that formed while the dough was rising.
- Turn the dough out onto a lightly floured surface. Use your fingers to shape the dough into a rectangle, then use a rolling pin to enlarge the shape. As you roll the dough, just roll in one direction at a time. Don’t go back and forth with the rolling pin. Roll from front to back of the rectangle and then from left to right. There’s no need to apply too much pressure here since this is a soft dough.
- As your rectangle begins to form, start in the middle of the dough and roll out towards each corner, gently forming a more defined shape. Even it out again by going front to back and left to right until you have a 12 in. x10 in. rectangle.
- Spread the cinnamon filling mixture evenly over the dough.
- Starting from the long end of the rectangle, begin rolling up your dough, like you would a jelly roll. Make sure the cylinder is tight so the rolls hold their shape.
- Once you’re done rolling, pinch the seam to seal all the good stuff inside and place it seam side down on a cutting board. Using a sharp knife, trim off the ends and cut into 8 equally sized pieces.
- Place the rolls into the prepared baking pan, spacing them evenly apart. Cover the rolls again with plastic wrap and let them rise in a warm spot for 25 to 30 minutes, or until they double in size.
- Preheat the oven to 350°F. Remove the plastic wrap and bake in preheated oven for 25 to 29 minutes, or until golden brown.
- Remove the baked rolls from the oven and make the icing glaze.
Icing Glaze
- Stir together 3/4 cup confectioners’ sugar and 1 tablespoon milk in a small bowl. Carefully drizzle the cinnamon roll icing glaze over the rolls and enjoy!
Tried this recipe?Take a picture and tag us @WiltonCakes on Instagram


Can I use rapid rise yeast instead.
Hi Miggle- Yes, rapid rise yeast and instant yeast are the same thing so you can certainly use rapid yeast instead. However, when using rapid yeast your rolls may rise faster so just keep that in mind and watch out for that.
These look wonderful but sticks of butter and cups of flour??? – please could we have measurements in grams or ounces for us Brits? Thanks.
Hi Susan-Thank you. We apologize for the delay in response. While these are approximate measurements I’ve listed conversions below.
2 cups bread flour: about 240 grams
¼ cup butter: 56.5 grams
¼ cup granulated sugar: 49.5 grams
¾ cup confectioners’ sugar: 85 grams
2/3 cup milk: 158 mL
Can this be prepared the night before and then baked the following morning? If yes, how to do it?
Hi Joseph- Yes these can! After forming rolls in the pan, cover them with plastic wrap (plastic wrap can be lightly greased or not) then refrigerate overnight. Pull the roll out of the fridge about an hour or so before you want to bake them so they’re at room temperature. Then bake as directed.
Can you use all-purpose flour instead?
Hi Sheila-Yes, you can use all-purpose flour instead. Just keep in mind that since all purpose flour has less protein in it than bread flour the dough might be a little sticky. If that happens, just add a tablespoon or so more of all-purpose flour until the dough is easy to handle.