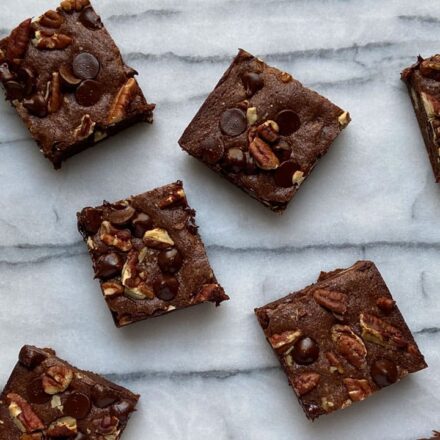
This one bowl brownie recipe is great if you need a little taste of something chocolatey! It’s easy to customize with your favorite mix-ins and is prepped with just one bowl to make a small batch (about 12 brownies). Perfect for weeknight dessert!
This scratch brownie recipe is a great go-to when you are craving something chocolatey, but don’t want to make a lot. Small enough for 2 to 3 people, this small batch brownie recipe has become a new staple at my house! Double the recipe if you want more chocolatey goodness. It’s filled with chocolate decadence and great with a cold glass of milk.
My favorite thing about this recipe is that it’s incredibly easy. Plus it only requires one bowl – no need to even get out your mixer! Delicious homemade brownies from scratch with minimal cleanup? Count me in!
Since this recipe makes a small batch, you can use an 8 x 8 in. or 9 x 9 in. square pan, or even a round pan will work for these. This recipe is also fun to customize with your favorite mix-ins!
Best Chocolate to Use for Brownies
Brownies are all about the chocolate…and chocolate comes in all different varieties and “levels”. If the wrapper has a percentage on it, that percentage is referring to the amount of cacao in that chocolate. Chocolate can also contain sugar, which varies among each type.
For this recipe, you can use either unsweetened or bittersweet chocolate. Unsweetened chocolate is 100% cacao with no added sugar. It is most often used for baking because it is super bitter to eat on its own.
Bittersweet has some sugar added and has about 60-70% cacao. Different brands will vary slightly.
Another note regarding the chocolate: we are using baking chocolate bars, not chocolate chips. The Wilton Test Kitchen tried this recipe using both semi-sweet chocolate chips and dark chocolate chips. However, neither of those batches had the same chocolate depth that the baking chocolate provided.
Baking chocolate will give you a beautiful dark brown color and intense chocolate flavor. In addition, chopped baking chocolate melts so beautifully and easily. Many chocolate chips contain stabilizers that make them difficult to melt, so save those for your mix-ins later!
How to Make Brownies Moist
For that classic soft and chewy texture, here are a few tips to keep in mind!
- Don’t overmix the batter. Once you add the flour to the batter, mix just until everything is combined. Overmixing can cause gluten to develop, which will result in tough brownies.
- Use the right size baking pan. For this recipe, we suggest an 8 or 9 in. square pan or a 9 in. round pan. Using a larger pan means your brownies will be flatter and less chewy. A smaller pan means your brownies may take longer to bake, increasing the chances of overbaking.
- Test for doneness. One of the best ways to make sure your brownies remain chewy and moist is to test their doneness. Your brownies are done when they’re inserted with a toothpick that comes out almost clean. This may take some practice, but once you’ve mastered the toothpick test, you’ll be enjoying moist brownies every time!
Easy Homemade Brownie Recipe
Ingredients:
- ½ cup (1 stick) butter, cut into ½ in. slices
- 3 oz. unsweetened or bittersweet bar chocolate, coarsely chopped
- 1 cup granulated sugar
- 2 eggs
- 1 teaspoon vanilla extract
- ¾ cup all-purpose flour
- ½ teaspoon salt
- 1 cup mix-ins divided (chocolate chips, chopped chocolate bars, candy-coated chocolate, peanut butter chips or chopped nuts are some of my favorites!)
Start off by preheating your oven to 350℉. Prepare your pan with vegetable pan spray and set aside.
I’m using a 9 x 9 in. square pan, but remember, you can use an 8 in. square or 9 in. round if you have either on hand!
Step 1: Combine the sliced butter and coarsely chopped chocolate into a large microwave-safe bowl. Slicing your butter and chopping your chocolate will help the two melt quickly and evenly. This is key to not overcooking your chocolate!

Melting chocolate must be done slowly, especially in a microwave. If the microwave setting is too high, the chocolate could burn and become grainy. Make sure to watch the chocolate closely and stir frequently.

Microwave the butter and chocolate at half (50%) power for 60 seconds. Stir and then continue microwaving at 30-second intervals until the mixture is smooth and completely melted. You can also melt the butter and chocolate in a heavy-bottomed saucepan on the stove if you prefer.

Step 2: Once your chocolate is smooth and velvety, add the sugar, eggs and vanilla. Stir until smooth.

Step 3: Add the flour and salt and stir just until combined. You don’t want to overwork the gluten in the flour and have tough brownies!

Step 4: Now it’s time to add in your mix-ins! This is where you get to make the brownies your own special custom creation. You can use chocolate chips or chunks, chopped nuts, or even some chopped up candy bars. Pecans, walnuts, peanuts, and pistachios are all delicious nut choices!
Mix-ins are great for giving your brownies texture and character. Make them dark and mysterious with extra dark chocolate chunks. Or try silly and fun with candy-coated chocolates and chopped pretzels. You can even make them more sophisticated with chopped toffee and hazelnuts. The possibilities are endless!

Step 5: Fold half of your mix-ins straight into your brownie batter. Spread the batter into the prepared pan. Then sprinkle the remaining half of your mix-ins on top of the batter for a pretty presentation!

Step 6: Bake your brownies for about 22 to 25 minutes, or until a toothpick inserted in the center comes out almost clean. If you’re using a 9 in. round, bake for 21 to 24 minutes. If you’re using an 8 in. square, bake for 25 to 28 minutes.

How to Tell if Brownies Are Done
Sometimes it’s hard to tell when brownies are done since they’re already so dark. But the toothpick test will give you a good indication. You don’t want the toothpick to be completely clean because then your brownies may be over-baked.
Once baked, cool completely on a cooling grid. Cooling is the final stage of the cooking process. As they cool, your brownies will settle and become easier to handle and cut.
How to Store Brownies
Your homemade brownies can be stored at room temperature – just cover with plastic wrap or keep in an airtight container to keep them fresh and moist.
How Long do Brownies Last?
Homemade brownies will last for about 3 to 5 days. They may start to become stale if kept at room temperature longer than a week or so.
Can You Freeze Brownies?
If you want to save your brownies for later, you can freeze them! Just wrap them tightly in plastic wrap and place in the freezer for up to a month. Let them thaw at room temperature before cutting and serving.
How to Cut Brownies Like a Pro
- Let them cool. To prevent your brownies from falling apart, make sure they’re cool before cutting. You can cut them into squares if you’re using a square pan or into wedges if using a round pan.
- Run the knife under hot water. You can also prevent the brownies from sticking to your knife by warming the blade under hot water before cutting. Wipe the blade clean after each cut for easier slicing.
- Pop them in the fridge before cutting. If your brownies are fudgy or super chocolatey, place them in the fridge before cutting. Cutting them cold will help prevent the crumb from sticking to your knife.
And that’s it! Serve with a cold glass of milk or top with a scoop of vanilla ice cream!

Did you use any fun mix-ins to give your brownies some personality? Share your custom creation with us in the comments and on social media. We love to hear from you!
Looking for more delicious brownie recipes? Check these out:


Decadent One Bowl Brownies from Scratch
Ingredients
- ½ cup Butter 1 Stick, Cut Into 1/2 Inch Slices
- 3 ounces Unsweetened or Bitter Bar Chocolate Coarsely Chopped
- 1 cup Granulated Sugar
- 2 Eggs
- 1 teaspoon Vanilla Extract
- ¾ cup All-Purpose Flour
- ½ teaspoon Salt
- 1 cup Mix-Ins (chocolate chips, chopped chocolate bars, candy-coated chocolate, peanut butter chips or chopped nuts)
Instructions
- Preheat the oven to 350℉. Prepare your pan with vegetable pan spray and set aside.
- Combine the sliced butter and coarsely chopped chocolate into a large microwave-safe bowl. Slicing your butter and chopping your chocolate will help the two melt quickly and evenly.
- Microwave the butter and chocolate at half (50%) power for 60 seconds. Stir and then continue microwaving at 30-second intervals until the mixture is smooth and completely melted.
- Once your chocolate is smooth and velvety, add the sugar, eggs and vanilla. Stir until smooth.
- Add the flour and salt and stir just until combined.
- Now it’s time to add in your mix-ins! This is where you get to make the brownies your own special custom creation. You can use chocolate chips or chunks, chopped nuts, or even some chopped up candy bars. Pecans, walnuts, peanuts, and pistachios are all delicious nut choices!
- Fold half of your mix-ins straight into your brownie batter. Spread the batter into the prepared pan. Then sprinkle the remaining half of your mix-ins on top of the batter.
- Bake your brownies for about 22 to 25 minutes. If you’re using a 9 in. round, bake for 21 to 24 minutes. If you’re using an 8 in. square, bake for 25 to 28 minutes.
- Use toothpick test to determine if brownies are thoroughly baked, in this case the toothpick should NOT be completely clean when removed from the brownies.
- Remove from oven and let cool. Then, serve and enjoy!


Which brand of chocolate chips are used in the recipe?
Hi Keertika- Any brand of chocolate chips can be used with this recipe. 🙂